


How do you install an aluminum hull rivet correctly in 2027?
Quality
Certified
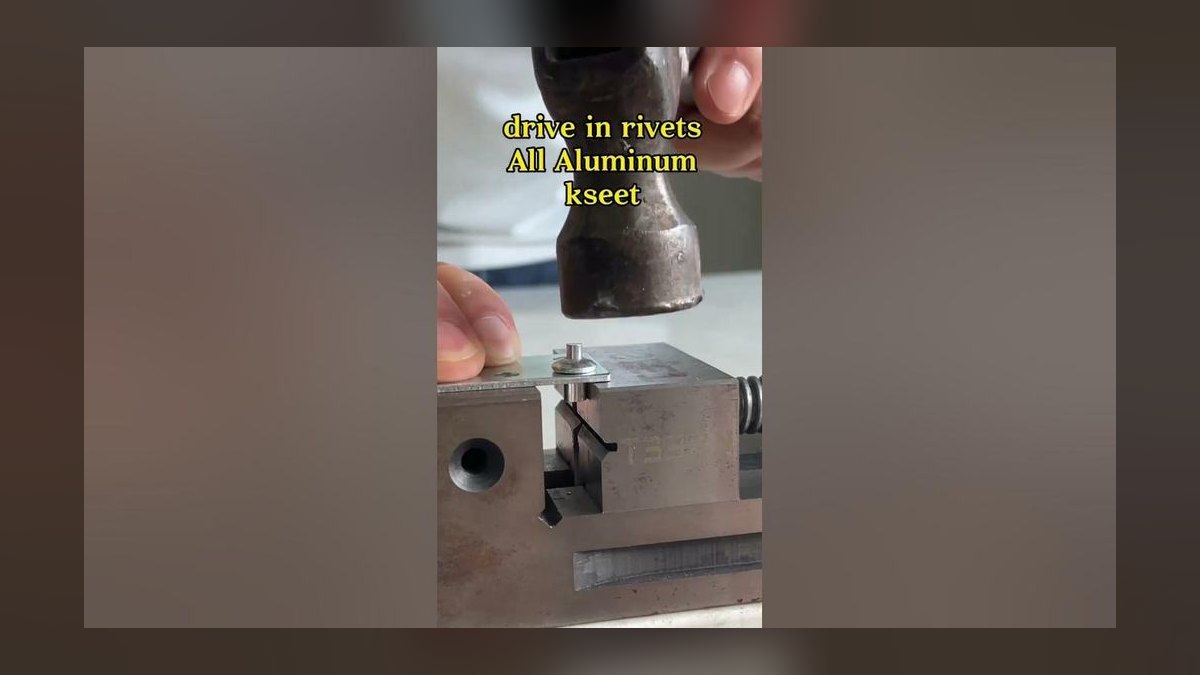
Drill or clean the hole to the rivet's specified diameter, deburr both faces, clamp the plates tight with no gap, then set the rivet — bucked solid or pulled blind — so the formed head reaches roughly 1.5× shank diameter across and 0.5× tall. Use aluminum rivets in aluminum hulls only, and seal every below-waterline hole.
What an aluminum hull rivet actually is and why the install matters
An aluminum hull rivet is a mechanical fastener that joins overlapping aluminum plates — hull skin to frame, strake to strake, transom knee to side sheet — by deforming a soft aluminum shank until it swells to fill the hole and clamps the stack between two heads. There is no thread, no torque spec, and no way to check tension afterward with a wrench. The entire joint quality is created in the two seconds the rivet is being set, which is why "install it correctly" is not a throwaway phrase on a boat hull. A badly set rivet looks identical to a good one from the outside and leaks for the next twenty years.
Two families cover almost everything you'll touch on a riveted aluminum boat. Solid rivets — the classic buck-and-hammer rivet used on Lund, Alumacraft, Starcraft, Grumman, Sea Nymph, Crestliner and similar riveted-hull runabouts and canoes — are a plain aluminum pin with a factory head on one end. You drive the head with a rivet set or gun while a helper (or a clamp fixture) holds a heavy steel bucking bar against the tail. The tail mushrooms into a "shop head." Solid rivets are strongest, are the original factory fastener on most riveted hulls, and are entirely watertight when set right because the shank swells and fills the hole.
Blind rivets — commonly called pop rivets — are a hollow aluminum body around a steel or aluminum mandrel. You pull the mandrel with a hand or pneumatic tool; it flares the far end of the body and snaps off. Blind rivets only need access from one side, which is why they dominate repairs where the inside of the hull is buried behind foam, a floor, or a sealed chamber. The critical distinction on a hull: an ordinary open-end pop rivet has a hole straight through it and a mandrel that can drop out. That is a leak path. Below the waterline you want closed-end (sealed) blind rivets, which have a cupped body with no through-hole, or you accept that you are relying entirely on sealant to keep the water out.
Why the material pairing matters more on a hull than anywhere else: aluminum sitting in water — especially brackish or salt water — becomes half of a galvanic cell the moment you put a dissimilar metal through it. A steel or stainless rivet through a 5052 or 5086 aluminum hull plate makes the surrounding aluminum the anode. It corrodes preferentially, the hole elongates, the joint loosens, and you get a weeping seam that no amount of sealant will permanently fix because the metal around the hole is dissolving. This is the single most common way an otherwise skilled repair fails eighteen months later. Aluminum rivets — 5056 alloy for solid work, or aluminum-body/aluminum-mandrel closed-end blinds — in an aluminum hull. That is the rule, and the reason it exists.
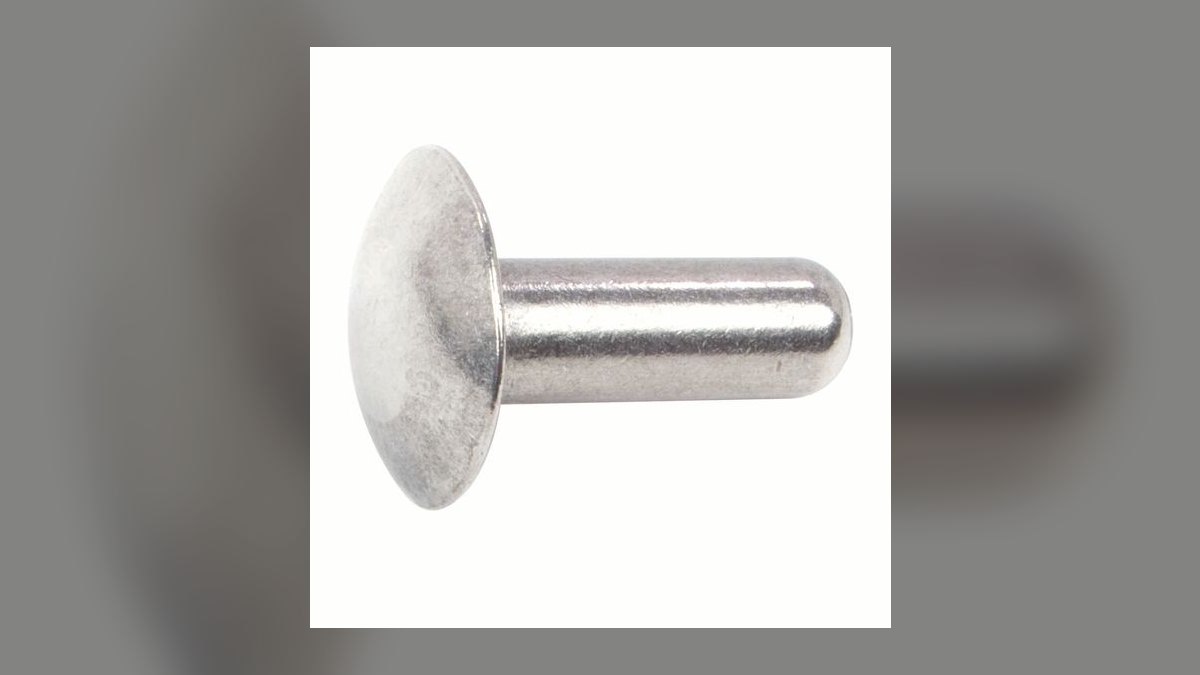
Correct installation also matters structurally because riveted hulls are designed as a distributed shear system. No single rivet carries much load; a strake seam might have a rivet every 1 to 1.5 inches specifically so that each one sees a small share of hull flexing, wave slam, and trailer bounce. When one rivet is loose, its neighbors take its share, work-harden, and start to loosen too. Riveted-hull leaks propagate along a seam for exactly this reason. Fixing one weeping rivet and ignoring the four around it is a repair you will redo.
The step-by-step process for setting a rivet correctly
Start with the hole, because more bad rivets come from bad holes than from bad hammering. For a repair, the existing hole is usually already there — an old rivet drilled out, or a factory hole that has elongated. Center-punch, then drill out an old solid rivet by drilling through the factory head only, at the head's diameter or slightly under, then snapping the head off with a punch and driving the remaining shank out. Do not try to drill the whole rivet out lengthwise; the bit wanders, walks off center, and turns a round hole into an oval one. If the hole is already oval or oversized, step up to the next rivet size — a 1/8 inch hole that has worn to roughly 5/32 gets a 5/32 rivet, not a 1/8 rivet floating in slop with sealant packed around it.

Match the drill to the rivet. The working rule for aluminum is a hole about 0.003 to 0.006 inch larger than the nominal shank so the rivet drops in without forcing but has essentially no play. In practice that means a #30 bit (0.1285) for a 1/8 inch rivet, a #21 (0.159) for 5/32, and a #11 or 3/16 letter bit for 3/16. Use a sharp bit, moderate speed, and light pressure — aluminum grabs and a dull bit will tear a lipped, out-of-round hole.
Deburr both sides. A burr on the inner face holds the plates apart by a few thousandths, and that gap is exactly where the rivet cannot clamp. A countersink bit spun by hand, a deburring tool, or a larger drill bit turned two or three turns by hand is enough. You are removing the raised lip, not cutting a countersink.
Get the length right. This is where most home repairs fail. For a solid rivet, the shank must protrude past the far side of the stack by about 1.5 times its diameter — a 1/8 inch rivet through 0.100 inch of combined plate needs roughly 0.19 inch sticking out. Too short and there isn't enough material to form a full shop head; too long and the shank buckles sideways instead of upsetting square, producing the classic banana-shaped or clubbed head that looks set but clamps nothing. For a blind rivet, read the grip range printed on the box — a 1/8 inch rivet with a 0.126–0.250 grip range means the total material thickness must land inside that window. Below the range the rivet bottoms out and can't flare; above it, the flare forms partly inside the hole and never seats against the back face.
Clamp before setting. Clecos are the right tool — spring-loaded temporary fasteners you drop into adjacent holes to pull the plates dead tight. A handful of clecos and a cleco plier cost very little and are the difference between a seam that seals and one that doesn't. Without them, the plates spring apart under the setting force and the rivet clamps a gap.

Then set it. For solid rivets: rivet set in the gun or hammer against the manufactured head, heavy bucking bar held square and firm against the tail. Short controlled blows. The bar's mass does the forming — a light bar bounces and work-hardens the tail without upsetting it, which is why a 2 to 4 pound bar beats a 1 pound one for hull work. Watch the shop head grow; stop when it reaches roughly 1.5× shank diameter across and 0.5× shank diameter tall. For a 1/8 inch rivet that's about 0.19 inch wide and 0.06 inch tall. For blind rivets: tool square to the surface, steady squeeze, let the mandrel snap on its own. Tilting the tool is the #1 cause of a blind rivet that pulls to one side and leaves a gap under the flange.
Sealing is a separate decision from setting. A correctly set solid rivet in a clean round hole is watertight on its own — that is how the boat left the factory. But on a repair you rarely have factory-clean conditions: the hole has some wear, the mating surfaces have old sealant residue and oxide, and the plate may be slightly deformed. The standard practice is to seal the mating surfaces, not just smear sealant over the head afterward. Apply a marine-grade polysulfide or polyurethane sealant, or a purpose-made aluminum boat sealer, to the faying surfaces and around the shank, set the rivet wet, and let it squeeze out. Sealant applied over the outside of a finished rivet is cosmetic — it hides the leak for a season and peels.
Avoid silicone (RTV) on an aluminum hull. It doesn't bond reliably to aluminum long-term, it traps moisture underneath, and — the practical killer — nothing else will stick to a surface it has touched, so the next repair fails before it starts.
Costs, timelines, and typical ranges
Consumables are cheap; the tooling and the labor are where the money sits. A box of aluminum rivets — solid or blind, in the common 1/8 and 5/32 sizes — runs in the low tens of dollars for a few hundred pieces. Closed-end sealed blinds cost meaningfully more per piece than open-end, often several times the price, but a hull repair uses dozens, not thousands, so the total difference is small and always worth paying below the waterline.
Tooling tiers, roughly:

- Hand pop-rivet plier — the cheapest entry point, fine for topside trim, seat frames, and gunwale caps. Struggles on 3/16 aluminum and will exhaust your hand over a long seam.
- Lever/lazy-tong or pneumatic blind riveter — the sensible step up if you're doing a full seam. Pulls larger diameters consistently and, more importantly, pulls them square without you fighting the tool.
- Bucking bar + rivet set + hammer — the solid-rivet kit. A set of bars in a few weights plus assorted sets is modest money and is what you want for structural seams on a riveted hull.
- Pneumatic rivet hammer (3X or 4X) — the tool a shop uses. Faster and more consistent than hand hammering over a long run; needs a compressor and some practice to avoid smiling the skin.
- Clecos and cleco pliers — inexpensive, and the highest return per dollar in the whole list.
Time estimates that hold up in practice. Replacing a single weeping rivet with both-sides access: 10 to 20 minutes including drill-out, deburr, set, and cleanup. A short seam of a dozen rivets: an hour to two hours, mostly setup and sealant work. A full strake seam on a 16-foot hull — commonly 100 to 200 rivets depending on spacing — is a weekend job for one person working carefully, or a day with a helper on the bucking bar. Add a full day if you have to pull a floor or foam to reach the inside.
Professional repair pricing varies enormously by region and shop, so treat any number you're quoted as a local figure rather than a national rate. The structure of the quote is what to evaluate: shops typically bill hull rivet work hourly plus materials, and the hours are dominated by *access* — removing decking, flooring, and foam — not by the riveting itself. If a quote seems high for "a few rivets," the labor is almost certainly the teardown and reassembly. Ask what's being removed to reach the seam; that single question explains most of the estimate.

Curing and return-to-service timelines matter for scheduling. Marine polysulfide and polyurethane sealants typically skin over in hours but need considerably longer to cure through — often 24 hours to several days depending on thickness, temperature, and humidity. Read the specific product's data sheet rather than guessing. Splashing the boat before the sealant has cured through is a common way to redo a repair. Plan a full day of dry cure minimum, and water-test in a driveway with the hull filled or the trailer nose-up before you commit to a launch.
One material budget item people forget: replace, don't reuse. Old rivets that have been drilled out are scrap. Old sealant must be fully scraped and solvent-cleaned off both faying surfaces before new sealant goes on, and that consumes more time and abrasive than the riveting. Budget for scrapers, a stiff nylon brush, acetone or a marine prep solvent, and rags.
Where teams and DIY repairs get it wrong
Using stainless or steel rivets because they're on the shelf. This is the most damaging mistake and it doesn't announce itself for a year or more. Galvanic corrosion around the fastener eats the aluminum, the hole elongates, the joint loosens, and the seam weeps. If the only rivet you can find locally is stainless, wait and order aluminum. There is no sealant that fixes a galvanic couple.
Setting a rivet into an oval hole and packing the gap with sealant. The rivet is now a plug, not a fastener. It carries no shear load, works loose under hull flex, and the sealant fails at the first hard chop. Step up a size and drill the hole round.
Over-driving the shop head. More hammering does not mean a tighter joint. Past the target dimensions you start thinning the head, cracking its edges, and — worse — dishing the surrounding hull skin. A shop head with radial cracks around its perimeter is a failed rivet even though it looks big and confident. Stop at roughly 1.5D wide by 0.5D tall.

Under-driving. The opposite failure, and harder to spot. The head is round and looks fine but is undersized, so the shank never fully swelled to fill the hole and never developed clamp force. The tell is a slightly small head plus the ability to feel or see daylight movement at the seam when you flex the panel.
Not clamping. Setting a rivet through plates that are 1/32 inch apart produces a rivet that clamps 1/32 inch of air. It'll be loose from day one. Clecos, vise grips with soft jaws, or a helper leaning on the panel — anything, but don't skip it.
Tilting the blind-rivet tool. A pop rivet pulled at an angle seats its flange on one edge and leaves a crescent gap on the other. That crescent is the leak. Square the tool, and if the surface is curved, use a rivet with a large flange or add a backing washer on the accessible side.
Using open-end pop rivets below the waterline. They are hollow. The mandrel head that plugs them is not a seal, and on aluminum-mandrel rivets it can be pushed through entirely. Closed-end (sealed) rivets exist precisely for this and are the correct choice.
Silicone. Covered above, but it earns its own line because it is so common and so hard to undo. Once silicone has touched an aluminum seam, every subsequent sealant fails until the surface is mechanically abraded back to clean metal.
Drilling out a rivet by drilling straight through it. The bit follows the softer path, wanders off the shank axis, and enlarges the hole asymmetrically. Drill the head only, at head diameter, then punch the shank out.
Treating one leaking rivet as an isolated event. On a riveted hull, a loose rivet loads its neighbors. Inspect and tap-test the entire seam, not just the one you can see weeping. Water travels along a seam before it drips, so the visible drip is often several rivets away from the actual failure.

Skipping the water test. "It looks sealed" is not a test. Block the trailer nose-high, fill the bilge area, and leave it for several hours to a full day. Chalk or dry paper towel along the inside of the seam makes a slow weep obvious. Finding it in the driveway costs nothing; finding it at the ramp costs the day.
Riveting over unprepped, oxidized aluminum. Aluminum grows an oxide layer immediately. For sealed joints, scuff the faying surfaces with an abrasive pad and solvent-wipe right before assembly so the sealant bonds to metal rather than to a powdery oxide film it can peel away with.
Decision framework: choosing rivet type, size, and sealing approach
The decision tree below is the one to walk before you drill anything. It resolves the three questions that actually determine the outcome — access, waterline position, and hole condition — and it deliberately puts "hole condition" last, because it's the one people check first and then ignore.
Applying it to real situations:
A single weeping rivet on an accessible strake, above the waterline. Solid aluminum rivet, drilled out and replaced same size, light sealant, no cure wait. Twenty minutes.
A weeping seam under the floor of a bass boat. The honest answer is that pulling the floor and using solid rivets is the durable repair, and closed-end blinds are the pragmatic one. Choose based on whether the boat has a season left or a decade. If you go blind, use closed-end rivets, seal the faying surfaces properly through whatever access you have, and accept that you'll revisit it sooner.
A hole that's been repaired before and is now visibly oval. Step up one rivet size. If it's already at 3/16 and still ovaling, the plate around it is fatigued — that's a patch-plate repair, not a rivet repair. Recognizing this boundary saves you from a cycle of ever-larger rivets in ever-worse metal.

A transom or knee attachment. These are high-load, and if the original fasteners were bolts, keep them bolts. Do not "upgrade" a bolted structural connection to rivets, and don't downgrade a solid-rivet seam to blinds because blinds are easier. Match what the builder specified.
Salt water service. Everything above, plus stricter material discipline. Aluminum rivet, aluminum mandrel if blind, sealed faying surfaces without exception, and a rinse-and-inspect habit. Salt finds every gap a freshwater boat tolerates for years.
The through-line in all of it: the rivet is not the hard part. A round, correctly sized, deburred hole with the plates clamped tight and the right alloy going into it produces a good joint almost automatically. Skip any one of those and no amount of skill with the hammer recovers it.
Related questions
Can you use stainless rivets in an aluminum boat hull?
No. Stainless in aluminum creates a galvanic couple in water; the aluminum around the fastener corrodes, the hole elongates, and the seam leaks. Use aluminum rivets — 5056 solid or aluminum-body blind — in aluminum hulls, always.
What size drill bit for a 1/8 inch aluminum rivet?
A #30 bit (0.1285 inch) is the standard match, giving a few thousandths clearance so the rivet drops in without play. Use a sharp bit and light pressure; a dull bit tears an out-of-round hole that no rivet will seal.
Do you need sealant on hull rivets?
A correctly set solid rivet in a clean round hole seals on its own, which is how factory hulls work. On repairs, seal the faying surfaces with marine polysulfide or polyurethane and set the rivet wet. Never silicone, and never seal over the outside only.
How tight should a shop head be?

Aim for roughly 1.5× shank diameter across and 0.5× shank diameter tall. Undersized means the shank never filled the hole; oversized means a thinned, cracking head and a dished hull skin. Both fail — the target range is narrow on purpose.
Can pop rivets replace solid hull rivets?
For structural seams, closed-end aluminum blinds are a compromise, not an equal. They're the right call when the back side is genuinely unreachable. Where you have access, solid rivets are stronger and are what the hull was engineered around.
FAQ
What's the difference between a solid rivet and a blind rivet on a boat hull?
A solid rivet is a plain aluminum pin set by hammering one end while a bucking bar backs the other, forming a shop head. It needs two-sided access, fills its hole completely, and is the factory fastener on riveted aluminum hulls. A blind rivet is hollow with a mandrel that's pulled from one side to flare the far end. It needs only one-sided access, which makes it the practical choice behind floors and foam, but the hollow body means you must use closed-end (sealed) versions anywhere water can reach.
Why did my rivet repair leak again after one season?
Three usual causes. The hole was oval and the rivet was acting as a plug held by sealant rather than as a fastener — hull flex worked it loose. Or the plates weren't clamped tight during setting, so the rivet clamped a gap. Or sealant was applied over the outside of the finished rivet instead of to the faying surfaces, so it peeled. A fourth possibility on older repairs: a dissimilar-metal rivet has been quietly corroding the aluminum around its hole.
How do I remove an old rivet without wrecking the hole?

Center-punch the rivet head, then drill into the head only — at roughly the head's diameter, not the shank's — until the head separates. Snap or pry the head off and drive the remaining shank out with a pin punch from the head side. Never drill lengthwise down through the whole rivet; the bit follows the softer material, wanders off-axis, and ovals the hole, which forces you into a larger rivet size you didn't need.
Can I install an aluminum hull rivet alone, without a helper on the bucking bar?
For solid rivets it's difficult but possible on accessible seams using a bucking bar held by a clamp, a weighted bar wedged in place, or a bar-and-brace arrangement. Quality drops because you can't feel the bar reacting. If you're working alone on a hull seam, either recruit a helper for the solid-rivet work or use closed-end blind rivets and accept the trade-off. Setting solid rivets one-handed with the bar bouncing free produces exactly the work-hardened, under-formed heads that leak.
Do I need to replace all the rivets on a leaking seam or just the wet ones?
Inspect the whole seam. Water tracks along the joint before it drips, so the visible wet spot often isn't the failed rivet. Tap-test along the seam — a loose rivet sounds dull compared to a tight one — and look for smeared, dark, or powdery residue around heads, which indicates working. In practice, if you find one loose rivet, expect its immediate neighbors to be loaded and worth replacing while you're already set up.
Is there a temperature or weather limit for doing this work?
Yes, mostly because of the sealant rather than the metal. Marine polysulfide and polyurethane products specify a working and curing temperature range, and cold, damp conditions slow cure dramatically — sometimes from a day to several. Check the specific product's data sheet. The riveting itself is unaffected by ordinary temperatures, but setting rivets wet with sealant that then never cures properly gives you a joint that looks finished and isn't.
Sources
- https://www.faa.gov/regulations_policies/handbooks_manuals/aircraft/amt_airframe_handbook — FAA Airframe Handbook, chapter on aircraft metal structural repair; the standard reference for solid rivet hole prep, shop head dimensions, and common driving faults.
- https://www.astm.org/ — ASTM International, standards for aluminum alloys and mechanical fasteners.
- https://www.aluminum.org/ — The Aluminum Association, alloy designations and properties for marine-grade aluminum.
- https://www.nasbla.org/ — National Association of State Boating Law Administrators, boating safety and vessel condition resources.
- https://www.boatus.org/ — BoatUS Foundation, consumer boat maintenance and repair guidance.
- https://www.abycinc.org/ — American Boat and Yacht Council, standards for marine construction including corrosion and dissimilar metals.
- https://www.uscgboating.org/ — U.S. Coast Guard Office of Boating Safety, recreational boat construction and inspection material.
- https://www.nace.org/ — AMPP (formerly NACE), corrosion engineering resources including galvanic corrosion fundamentals.
Related on PULSE
- How do you fix a leaking seam on an aluminum boat hull?
- What sealant should you use on an aluminum boat below the waterline?
- How do you tell if a hull rivet is loose before it leaks?
- When should you patch-plate an aluminum hull instead of re-riveting?
- What causes galvanic corrosion on an aluminum boat and how do you prevent it?
This page will be disappearing soon. Save it to your device for $1 — or read it free while it is here.
@Kory-White- · if Venmo asks, the last 4 of my number are 2012
This page is gone.
This one is off the shelf now. $1 keeps it on your phone for good — the whole page, pictures and diagrams included.
 pulse-recentTop 10 Speed Boats 1972 — Best Overall + Best Value
 boatTop 10 Bay Boat Models for Shallow Water in 2027
 pulse-recentTop 10 Catalina Sailboat Models 2012
 pulse-recentTop 10 Lowe Boat Models in 2027
 pulse-recentTop 10 Catalina Sailboat Models 2020
 pulse-recentTop 10 Godfrey Pontoon Models in 2027
 pulse-recentTop 10 Marine Fish Finder Models in 2027
 pulse-recentTop 10 Catalina Sailboat Models 2023
 pulse-recentTop 10 Mako Boat Models in 2027
 pulse-recentHow do I choose between a bowrider and a deck boat for family outings in 2027?